


 Roll over image to zoom in
Modification Kit for Making Spongeless Cartridge with HP Integrated Cartridges 60, 61, 62, 63, 64, 65, 66, 67, 68, 69, 70, 74, 75, 901(AS-RFC-HPSQ803-LEFT)
Works on both XL and non-XL cartridges! Difficulty Level: 5 (Very Difficult) Warning: The black cover can be mistakenly installed backward. Therefore, please take a closer look at your old...
$19.99
SKU:
AS-RFC-HPSQ803-LEFT
Categories:
Tags:
Works on both XL and non-XL cartridges!
Difficulty Level: 5 (Very Difficult)
Warning:
- The black cover can be mistakenly installed backward. Therefore, please take a closer look at your old cartridge. The two bars should be towards you, and the one bar should be towards the electronic ribbon. If you install it backward, it won't fit in the printer anymore.
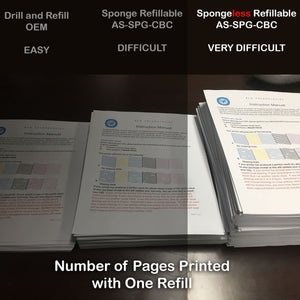
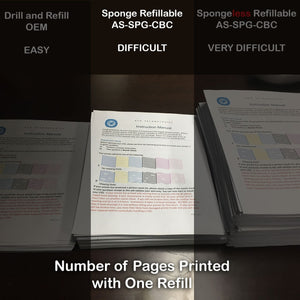
- If you sand the cover down too much, the final result will be shorter than the regular cartridge. Here is what our customer Matt found: "I purchased BCH ink refill and black + color spongeless cartridge modification kits to be used with an HP Envy 7858 printer. I successfully converted the black cartridge and could print it for a couple of weeks, 12-15 pages. Then, the printer started giving me a generic black cartridge error about "make sure cartridge is installed correctly" that I could not get to clear after removing the black cartridge, inspecting it, and reinstalling. I cleaned all contact surfaces and made sure there were no blockages. After a closer inspection, I noticed the cartridge was not sitting as high as the non-modified color cartridge, maybe 1/16 of an inch, regardless of uninstalling and reinstalling in a usual fashion. I fixed the error message by placing my finger under the exposed back end of the black cartridge and pulling it upward. During that action, I saw a small metal piece engage w/ a slight click. This fixed the error, and I was able to print. I have no good explanation for why this happened but will be doing this extra action when installing cartridges to make sure they're seated properly."
- For HP 67 cartridges, not all of them are suitable to refill. Some of them has E1/E0 errors built into them and will not take refills. Make sure your get a good cartridge before the modification. For details, please see video: https://youtu.be/ipueD4xutk4
This kit should be bought by experienced refillers.
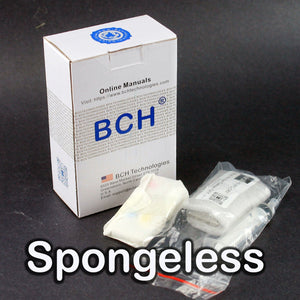
- This kit can make HP square-shaped Integrated Cartridge into spongeless cartridges.
- Yes, it includes both color and black Covers! We started at black and then added the color cover to this kit.
- The process involves cutting with a sharp knife and glue things together.
- This is a Level-5 Project. Please read our Beta Tester's Tip before proceeding. The unit is shipped without ink.
This kit modifies an HP integrated cartridge and makes it refillable. HP integrated cartridges are the ones with printhead built-in with the cartridge, such as HP 60, 61, 62, 63, 64, 65, 66, 67, 68 ... Once the cartridge is depleted, HP allows the printer to keep printing. However, HP will not show ink level anymore. To take this advantage, we modify an OEM cartridge by installing a refillable cap with pressure regulator and thus make it a spongeless refillable cartridge.
For international buyers (outside US & Canada), this kit also supports
- HP 121 (CC640HE)
- HP 301 (J3M81AE, N9J72AE)
- HP 302
- HP 304
- HP 305
- HP 343
- HP 338
- HP 650
- HP 652 (F6V25AE)
- HP 662
- HP 664 (F6V28AL, F6V29A)
- HP 678
- HP 680 ((F6V27AA))
- HP 802
- HP 803
- Not sure? Email us support@bchtechnologies.com
There are two kinds of HP integrated cartridges for desktops: square-like shaped, such as HP 60, 61, 62, 63, 64, 65, 97...

Figure 1. Example of HP 63, a square-like shaped integrated cartridge. Most of HP's integrated cartridges are square shaped.
There are also some long rectangle shaped cartridges but this kit will not fit them.

Figure 2. Example of HP 96, a long rectangle shaped integrated cartridge and comparing it with HP 97 (square shaped).
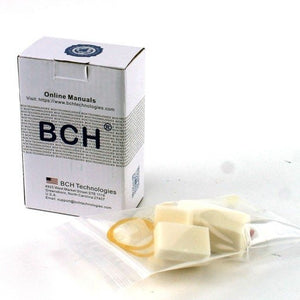
Package content:
- 1 x Black Cover
- 1 x Color Cover
- 1 x Priming Syringe
Procedures:
Installation Video
Directions
Step 1. Preparation. Two parts of the cartridge need to be protected. One is the printhead on the bottom of a cartridge, which needs to be protected from dirt and debris. Another one is the electronic ribbon, which needs to be protected from the overflow of Super Glue. We will use a piece of Saran Wrap, or clear tape to do the job. Caution, if we use clear tape, it will be essential to apply the nonsticky side towards the printhead. Otherwise, if the printhead comes in contact with glue, the printhead may be damaged permanently. After that, we will use two more pieces of clear tape to secure the protective portion to the cartridge body, as we wrap one piece around the bottom and one piece around the side.
Step 2. Cutting. We will next use a utility knife to cut off the top. This step involves a sharp knife, so we must handle carefully. Starting from the edge, we will use the edge as a pivot and push the blade up and down. Once the border is open, we will work on the other sides. Once all the edges are loosened, the cap can be taken off and expose the sponge inside. Important: write down the color sequences of the cartridge. HP makes the same cartridge with different color arrangements now, and your cover's color-coded plug may be different than the cartridge. We will need to match the cover with the cartridge.
Step 3. Sanding. We won’t take the sponge out yet, because we need the sponge to protect the printhead from dirt and debris in this step. We will use a 150 grit sandpaper to sand the top of the cartridge evenly and smoothly. We will then use a knife to remove the hanging debris.
Step 4. Wall removal
HP cartridges have internal walls to limit the cartridge capacity. We will use a long plier to remove the barriers. By doing so, we will increase the cartridge ink capacity to the XL level. In fact, the BCH's sponge is specially designed so that it will hold more ink than the HP XL cartridge.
We don’t have to remove the walls completely. It will work as long as ink can flow freely inside the chamber.
Step 5. Cleaning. We will now wipe or blow out the debris on the top of the cartridge. After removing the sponge, we suggest cleaning the inside of the cartridge again. We can use compressed air or distilled water or tap water. If we see dried ink on the filter, it is an excellent time to put it under running water and wash it until the screen is clean.
Step 6. After the top is dry, we will try to fit the cover on the cartridge. We will do it again and again until we can insert the cover in one take. Because we want to seal each compartment airtight, and the inside diving walls are thin, we can add a little Super Glue to the inner grooves of the cover. We will apply a generous amount of Super Glue on the rim of the cartridge.
We will insert the cover and secure it with a rubber band. Then, we will leave the cartridge to cure according to the glue curing time.
Step 7. After double-checking the color arrangements, we will add ink until each compartment is full. Then, we will insert the plugs to seal off the top. We will clean the electronic ribbon and then insert the cartridge into the printer and do a printhead cleaning using the printer's function.
After we put the cartridge back to the printer, if the printer is working, but the printout is blank or has stripes, then the printhead is clogged. If some nozzles are clogged, we will blow 0.5 ml of air into the cartridge. We should see ink running out of the printhead. If we don't see this, then the bottom is clogged heavily by dried ink. We will need to soak the cartridge in warm water first.
For a heavily clogged printhead, we can use traditional unclogging methods such as using a priming clip to suck from the bottom. Or, we wrap the cartridge with a wet paper towel and suck with a vacuum cleaner. For spongeless cartridge, we now have a new way of unclogging. Because all the color chambers are sealed airtight, if we sealed it correctly, we can blow air into the air hole and push ink out. This method is convenient and useful for minor clogs. However, if the printhead is clogged rock solid, the blowing air method is not going to work. It will either create an ink backflow or blow off the refill plug. Furthermore, after blowing air, we may want to release the pressure inside the cartridge by remove and reinsert the refill plug.
After dabbing the cartridge dry, we will place the cartridge back into the printer.
Step 8. The refilled cartridge will not show the new ink level. If the printer is printing, but the output is blank, there is a clogging issue. We will refer to #7 above to solve the clogging. The printer should work until the printer thinks the ink is depleted. For HP printers, we’ll click the "OK" button to acknowledge the ink depletion and keep using the printer. For Canon printers, a window with “error code 1688” will pop up in the middle of printing. We must not close this window. With the warning window open, we’ll hold down the STOP button for five seconds, and the printer will get back to work.
Step 9. The printer should work forever now. We will pay attention to the printout. If a color is fading, we will take the cartridge out and add more ink. If the cartridge is printing in stripes, we will take the cartridge out and unclog it using procedure #7 above.
Package content:
1 x Black Cartridge cover, with air pressure assembly and a black refill plug.
1 x Color Cartridge cover with air pressure regulator and color refill plugs
1 x Flat-head priming syringe with a silicone tip.
Things you will need (not included in the package):
Required Tools:
- 1. Sandpaper, 120- 150 grid.
- 2. Heavy-duty utility knife
- 3. Some rubber bands
- 4. Super Glue. Do not use foamed glues, such as Gorilla White. The Gorilla Clear or Brown is okay to use. When picking glue, we will make sure it is waterproof. Then, we will check its tack-free time and cure time. For example, the Gorilla Clear Glue is foam-free, two-hour tack-free, and 24-hour cure. Therefore, we will probably leave it at least twelve hours before using the product.
- 5. Long nose plier (for a sponged refillable cartridge).
- 6. Ink
Beta Reviewer's Tip
Doug 5/27/2019
I have made 3 sets of spongeless cartridges thus far. this past set, I used DAP rapid fuse with primer(for plastic). It states a 30 min cure time. I let it set for and hour and was able to start printing. So in less than two hours, I was able to mod the cartridge and start printing. Just wanted to share. Thanks.
Related products


Add your product to the cart to view shipping rates. We've delivered to 289,762 customers in 149 countries.

Sign up for our newsletter to get weekly coupons and tips on printer refills and repairs.
Got a question? Don't hesitate to email us at support@bchtechnologies.com
Subscribe to Kevin's YouTube channel for the latest tips on printer repair and maintenance.
Recently viewed


VERY VERY SUPER PRODUCT. I purchased this product from Kevin and I can always say that Kevin is the best. Kevin definitely creates the best videos on the web. He has the best products and I always buy from him. Kevin also always recommends the best methods. I always recommend buying BCH TECHNOLOGIES products to always have perfect printers.
Alessandro R.
Instruction Sheet for L1800 / 1390 Printhead Testing with Multimeter (Digital Download) Instant Download — Delivered to Your Email
Best thing ever!! i used to put cleaning solution in the capping station with a syringe/hose then had to suck out f the wast line with a syringe.... over and over until the capping station was clean. maybe up to 10 times. now i just use maybe 1 or 2 - 30ml syringes full of water and the pump cleans it out so good.... then I put capping solution, place printhead over capping station and turn on the back of the machine. thats it. when i print again, usually next day, I pull from waste tank a few times until I get ink, then i run 1 head cleaning , print a test strip and usually good to go. I sometimes print a 2nd test strip. SO MUCH easier to use this little pump. so glad I bought it.
Ruth F.
TMS Printhead Maintenance System by BCH: Comprehensive Cleaning and Maintenance Solution
This is a must have modification to save time troubleshooting. You will need to download Kevin's capping station video to disassemble the capping station. A definite must. You will also need a few other connections to hook this up. All parts are linked in his videos. Pro tip. Have patience and go slow. This modification will save you from a lot of headaches . I did this mod on Procolored L1800 about a year old . Thanks Kevin.
Vincent K.
Waste Ink Collection Tank Combo with Small Tube for Epson (AS-EP-WASTE-25MM)