


 Roll over image to zoom in
DTF Printhead Carriage Return Screw Hole Repair - Complete Screwhole Kit - L1800 L800 L805 1390 1430 based Printers
BCH Stripped Screw Hole Repair Kit for Printhead Carriage Return Struggling with stripped screw holes on your printhead carriage return? Don’t let this small issue turn into a big problem....
$29.99
BCH Stripped Screw Hole Repair Kit for Printhead Carriage Return
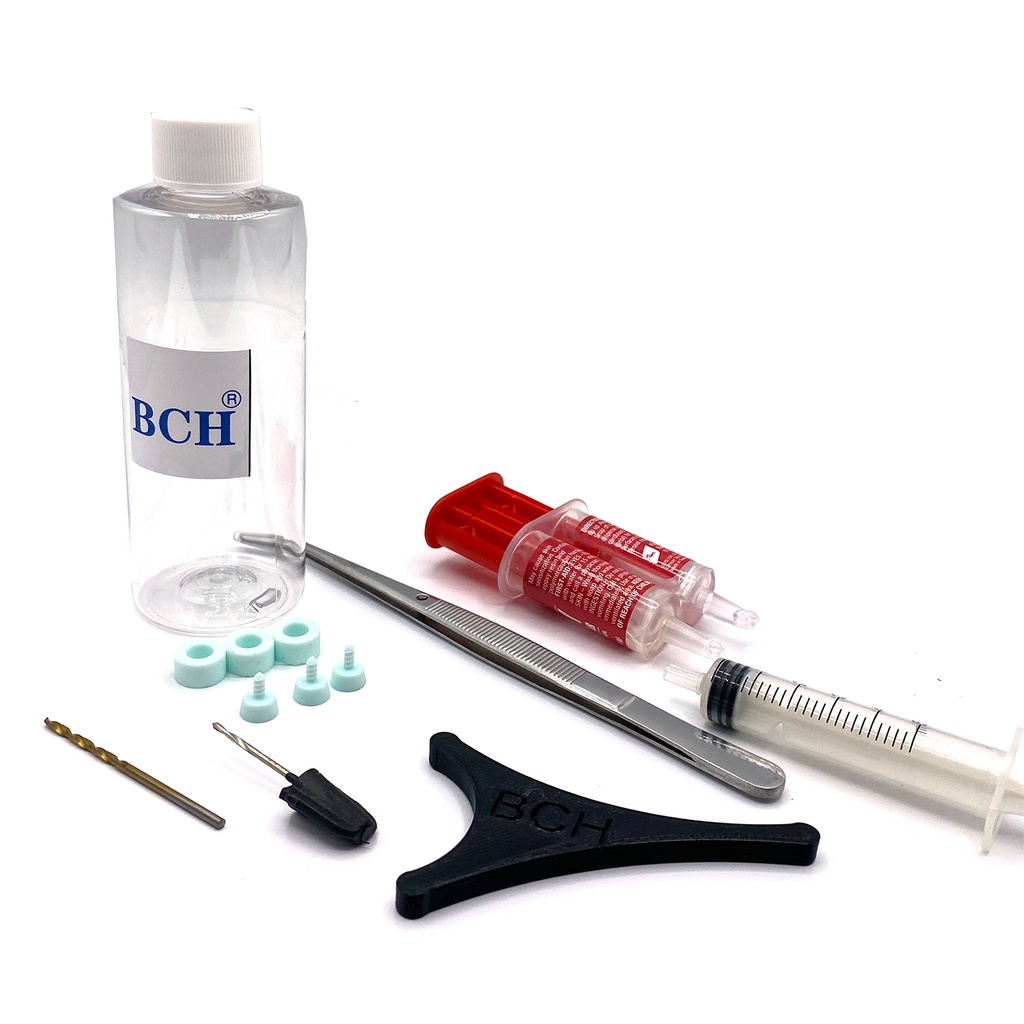
Struggling with stripped screw holes on your printhead carriage return? Don’t let this small issue turn into a big problem. Introducing the BCH Stripped Screw Hole Repair Kit, a comprehensive solution to restore the functionality and security of your printhead. With this kit, you can easily fix your screw holes and ensure an airtight seal for your capping station, preventing clogs and drying out.
Here’s what makes this repair kit a must-have:
Features:
- Complete Kit for Repairs: Includes rubber screws, tweezers, a protective sleeve, and other essentials to make repairs straightforward and effective.
- Custom Drill Bit: The included 3 mm drill bit ensures the perfect hole size for a snug fit.
- Protective Sleeve: Prevents epoxy from expanding and distorting the repair area over time.
- Reusable Components: Most parts, including the tweezers and protective sleeve, can be used repeatedly for future repairs.
Why Choose BCH?
- Prevents Printer Downtime: Securely fixes your printhead, allowing the capping station to clean effectively and maintain printhead longevity.
- Easy to Use: Step-by-step instructions make it accessible even for first-time users.
- Durable Repairs: High-quality epoxy ensures a long-lasting hold.
How It Works:
- Prepare the Hole: Use the 3 mm drill bit to smooth out the stripped hole.
- Insert the Rubber Screw: Fit the screw snugly using the included tweezers or your hands.
- Apply Epoxy: Mix the included epoxy (1:1 ratio), add a few drops to each hole, and use the poker tool to settle the epoxy.
- Secure the Screw: Insert the rubber screw and ensure it’s flush with the surface.
- Set and Cure: Use the protective sleeve and provided tools to hold the repair in place while the epoxy cures (typically 12 hours).
Additional Benefits:
- Efficient Epoxy Use: The kit includes a syringe for precise application, saving you from wasting epoxy.
- Reusable Tools: Once the initial repair is complete, you can use the kit components for future repairs.
Why You Need This Kit
Stripped screw holes compromise your printer’s performance by disrupting the airtight seal necessary for cleaning and ink flow. With the BCH Stripped Screw Hole Repair Kit, you can restore your printhead carriage return quickly and effectively, saving time and money on professional repairs.
Visit BCH Technologies for this repair kit and other essential printer solutions.
(Don’t forget to check out Kevin’s video tutorial linked in the product description for detailed repair steps.)
Say goodbye to stripped screw holes and hello to a perfectly functioning printer with the BCH Stripped Screw Hole Repair Kit!
Related products


Add your product to the cart to view shipping rates. We've delivered to 289,762 customers in 149 countries.

Sign up for our newsletter to get weekly coupons and tips on printer refills and repairs.
Got a question? Don't hesitate to email us at support@bchtechnologies.com
Subscribe to Kevin's YouTube channel for the latest tips on printer repair and maintenance.
Recently viewed


VERY VERY SUPER PRODUCT. I purchased this product from Kevin and I can always say that Kevin is the best. Kevin definitely creates the best videos on the web. He has the best products and I always buy from him. Kevin also always recommends the best methods. I always recommend buying BCH TECHNOLOGIES products to always have perfect printers.
Alessandro R.
Instruction Sheet for L1800 / 1390 Printhead Testing with Multimeter (Digital Download) Instant Download — Delivered to Your Email
Best thing ever!! i used to put cleaning solution in the capping station with a syringe/hose then had to suck out f the wast line with a syringe.... over and over until the capping station was clean. maybe up to 10 times. now i just use maybe 1 or 2 - 30ml syringes full of water and the pump cleans it out so good.... then I put capping solution, place printhead over capping station and turn on the back of the machine. thats it. when i print again, usually next day, I pull from waste tank a few times until I get ink, then i run 1 head cleaning , print a test strip and usually good to go. I sometimes print a 2nd test strip. SO MUCH easier to use this little pump. so glad I bought it.
Ruth F.
TMS Printhead Maintenance System by BCH: Comprehensive Cleaning and Maintenance Solution
This is a must have modification to save time troubleshooting. You will need to download Kevin's capping station video to disassemble the capping station. A definite must. You will also need a few other connections to hook this up. All parts are linked in his videos. Pro tip. Have patience and go slow. This modification will save you from a lot of headaches . I did this mod on Procolored L1800 about a year old . Thanks Kevin.
Vincent K.
Waste Ink Collection Tank Combo with Small Tube for Epson (AS-EP-WASTE-25MM)