

 Roll over image to zoom in
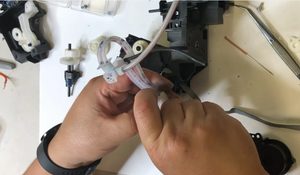
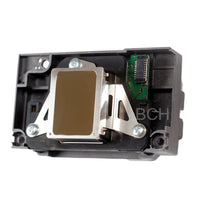
Instruction for Epson Stylus C88+ Printhead Install/Uninstall
Workflow sheet for install/uninstall printhead for Epson Stylus C88+ Series (C86, C88, C88+, and D88) Package include Video Instruction for Removal of External Casing Video Instruction for Removal and Replace...
$5.99
SKU:
Video-EP-C88-Printhead
Categories:
Tags:
Workflow sheet for install/uninstall printhead for Epson Stylus C88+ Series (C86, C88, C88+, and D88)
Package include
- Video Instruction for Removal of External Casing
- Video Instruction for Removal and Replace Printhead
Epson C88 Printhead Replacement Guide. Follow these easy steps in the video to remove and replace your printhead:
- Using a small screwdriver, remove two screws to access the cover.
- Pry open the cover using a flat screwdriver, starting from one side and working your way around.
- Remove the cable cover and secure the tab to prevent it from sliding down.
- Remove the CSIC cable and board, if necessary, by punching and lifting it up.
- Remove the front frame by removing two screws and lifting off the rail.
- Remove the timing belt by holding it down, sliding to the right, and pulling it out.
- Release the two important tabs on the left and right to remove the printer carriage.
- Remove the cover to access the page width sensor and disconnect all cables.
- Slide the new printhead in and secure the two tabs to stabilize the front rail.
- Reinstall the cable, page width sensor cover, and timing belt.
- Power on the printer and run a test.
- If the carriage does not move, check for twisted cables, incorrect rail placement, or incorrect cable connections.
Note: Do not separate the two cables when removing them and make sure to secure the tabs before inserting the printhead. The PW sensor cover can be left off until the cables are connected.
Delivery: instant delivery digital product (if ordered alone).
If you didn't order other products from our store, then digital files will become immediately available for you to download. You will get a link to download their files after completing payment, and will receive an email with a download link too.
If you order other products from our store, it will have to be manually set to Completed before you are given the download link. Therefore, please order this digital product seperately from other things. There is no shipping or handling charges on digital product, so you are paying the same no matter you order alone, or with other products.
All digital product has to be downloaded within 30 days.
Related products


Add your product to the cart to view shipping rates. We've delivered to 289,762 customers in 149 countries.

Sign up for our newsletter to get weekly coupons and tips on printer refills and repairs.
Got a question? Don't hesitate to email us at support@bchtechnologies.com
Subscribe to Kevin's YouTube channel for the latest tips on printer repair and maintenance.
Recently viewed


VERY VERY SUPER PRODUCT. I purchased this product from Kevin and I can always say that Kevin is the best. Kevin definitely creates the best videos on the web. He has the best products and I always buy from him. Kevin also always recommends the best methods. I always recommend buying BCH TECHNOLOGIES products to always have perfect printers.
Alessandro R.
Instruction Sheet for L1800 / 1390 Printhead Testing with Multimeter (Digital Download) Instant Download — Delivered to Your Email
Best thing ever!! i used to put cleaning solution in the capping station with a syringe/hose then had to suck out f the wast line with a syringe.... over and over until the capping station was clean. maybe up to 10 times. now i just use maybe 1 or 2 - 30ml syringes full of water and the pump cleans it out so good.... then I put capping solution, place printhead over capping station and turn on the back of the machine. thats it. when i print again, usually next day, I pull from waste tank a few times until I get ink, then i run 1 head cleaning , print a test strip and usually good to go. I sometimes print a 2nd test strip. SO MUCH easier to use this little pump. so glad I bought it.
Ruth F.
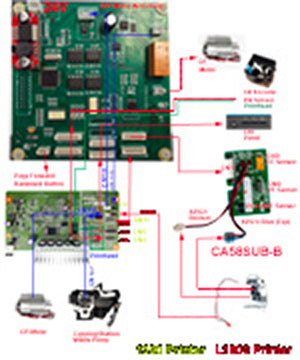
TMS Printhead Maintenance System by BCH: Comprehensive Cleaning and Maintenance Solution
This is a must have modification to save time troubleshooting. You will need to download Kevin's capping station video to disassemble the capping station. A definite must. You will also need a few other connections to hook this up. All parts are linked in his videos. Pro tip. Have patience and go slow. This modification will save you from a lot of headaches . I did this mod on Procolored L1800 about a year old . Thanks Kevin.
Vincent K.
Waste Ink Collection Tank Combo with Small Tube for Epson (AS-EP-WASTE-25MM)