How to Repair ADF Feeder Parts for HP OfficeJet Pro
- By
- On Mar 29, 2022
- Comment 0
Today, we will be working on the scanners and document fitters on an HP OfficeJet Pro. The goal here is to learn how to take it apart and replace some of the components. If you need parts for your printer or want to view a different worksheet, you can click here.
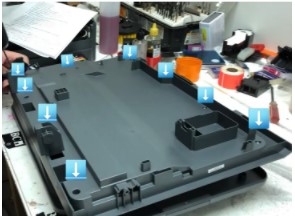
For the first step, you're going to need a T10 screwdriver to remove nine screws. If you don’t have one or are unsure, you can go to your local hardware store to look for one. The nine screws you’ll need to remove are located at the bottom of the scanner — the areas indicated in the image below.

Now you can separate the scanner from the automatic document feeder. To do so, pull the lever located on the bottom of the device, in the top left corner. After completing these steps, the two pieces should be free to wiggle apart.
We’re going to focus on the scanner part of this machine for now. There are three levers at the bottom of the scanner you’re going to need to push. However, you don’t want to do this with the scanner upside down because all the internal mechanisms will fall out after pressing the third lever.
Push in the Tabs
We can start by holding the scanner vertically and pushing the first tab. From here, you can either use your finger or a pair of pliers to keep the tab in the open position. Repeat this same process on the second tab. The third tab is going to be a bit different. You want to make sure you have the glass side up when you open the scanner so that all pieces don’t fall out.
Now you’ll need to remove the top carefully. You will have access to the inside of the scanner. The scanner lamp will go back and forth on a geared rail, similar to how a train works. If the scanner lamp has burned out, this is the section you’ll need to access if you want to fix it. Sometimes the belt will get loose, too, or you may be missing the little white reader piece.
If you need to replace the scanner glass, this is fairly simple. Just pull the tabs holding it in place and carefully remove the panel you have in there. Make sure you don’t lose the little white reader piece we mentioned earlier when you’re removing the glass. The scanner won’t work without it. The white strip is also vital for the scanner because that’s what the scanner uses to scan when you start it up. If you see a yellow-tinted strip or get ink on it, the scanner will get an error message, and it needs to be changed.
Removing the Automatic Feeder
Setting the scanner aside, we will work on the other part of the machine, the automatic feeder. There are going to be two screws on there for you to remove. After that, you will be able to open the top. Once you have done this, you will find eight additional screws (four on each side). Remove these as well.
Now you’ll want to flip it over. There, you will find a total of two tabs: one on the top and one just below that. When you loosen the top tab, you’re going to want to put something in place to keep that open. Then you can push on the bottom tab, and it will open up as well. You should now be able to wiggle the base apart from the rest of the machine.
The left side of the plastic underneath should be loose enough to just fall off. You’ll need to push a tab in for the right side and just use your hand to gently rotate the top of the piece toward the outside of the mechanism.
For help replacing the printhead on the printer, click here.
