


 Roll over image to zoom in
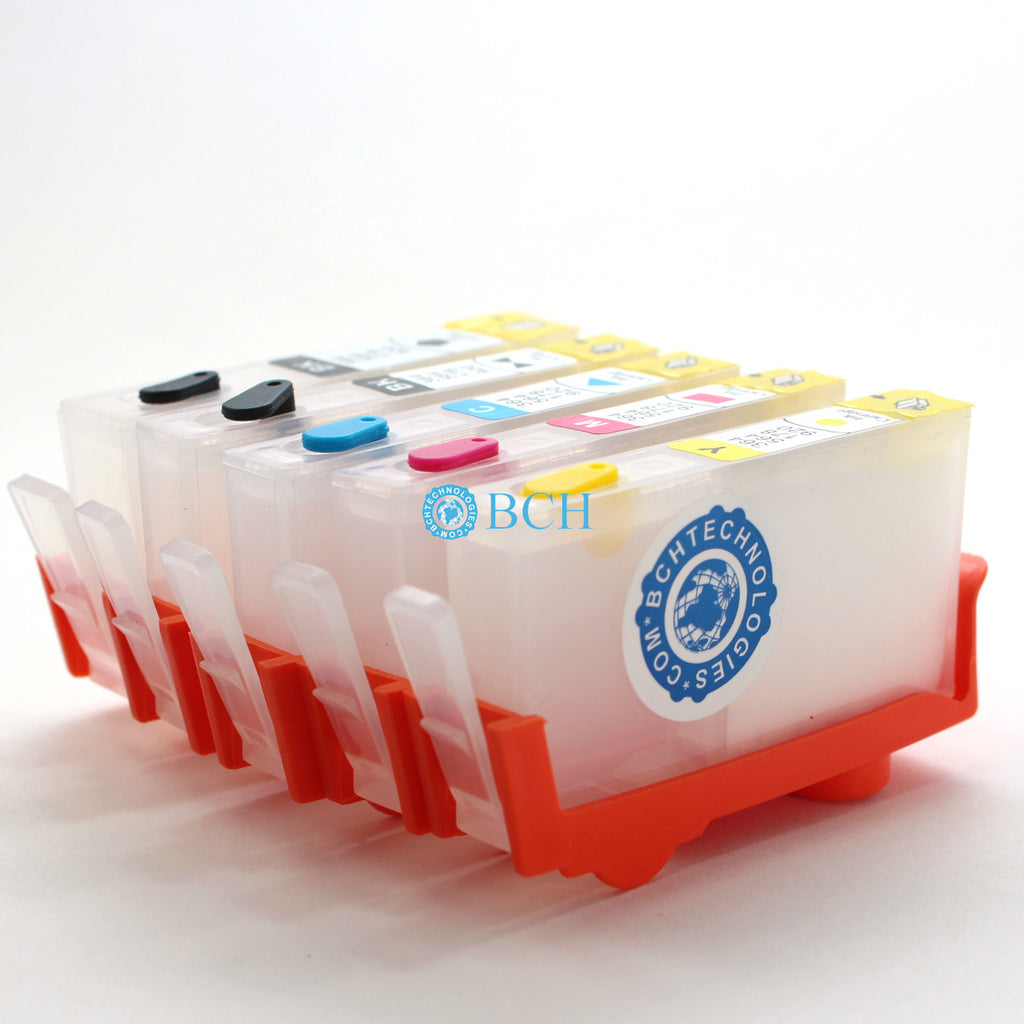
5 BLANK Refillable Cartridges for HP 178 364 564 920 902 934 935 Cartridges for Photosmart Series (No Chip)
Work with Photosmart series with 5 cartridges (with photo black) These are blank cartridges (no ink, no chip). It will NOT work on your printer if you don't know how...
$19.99
Work with Photosmart series with 5 cartridges (with photo black)
- These are blank cartridges (no ink, no chip).
- It will NOT work on your printer if you don't know how to use them.
Contents
- 1 Regular Black Refillable Cartridge Body.
- 1 of each: Photo Black, Cyan, Magenta, Yellow Body
We do not make the super-wide body, for example, 902XL, so you have to use regular black body
We do not have 4-pack. If you don't need the photo black, you can buy this but keep the extra cartridge as a spare.
Suggestions from our customers:
Bob (07/16/2018):
While that method works, to do it successfully and safely requires a good a bit of skill. It also occurs to me that most homes don’t have Dremel toolkits . Yet, it is important to your business that people be able to do this job conveniently and easily. With that in mind, I’d like to suggest the following revisions:
It is easier and safer to cut the chip loose with a hand saw than with a rotary tool. Especially if you have a bench vise to hold the cartridge while you do it (most home shops do). Just about any handsaw would do—even a hacksaw. But a razor saw (link) such as a Xacto X75300 (link) or a Zona 35-500 (link) would work especially well.
To more easily and safely thin and flatten the plastic on the back of the chip, first secure it to the narrow side of a piece of a wooden 2x4 with double-faced tape (contacts-side down), and clamp that in a bench vise. (If you have a vise; else you could secure it to your bench top with another piece of double-faced tape. Or just have someone hold it still on a table for you.)
Wrap a piece of ~150-grit sandpaper around the center section of a wooden paint stirrer. Grasp the stirrer by its two ends (like a spokeshave , link). Using your thumbs to keep the sandpaper from unwrapping, work the sandpaper back-and-forth over the plastic until it is as thin and flat as you want.
A few drops of a solvent (such as paint thinner, lighter fluid, WD-40, or oil) should help to ease the grip of the double-faced tape on the chip. Nail polish remover would work, too, but it might dissolve the plastic.
Also, it ought to be obvious to users that fastening the salvaged chips to the printer slots is a better solution than fastening them to refillable cartridges, since that enables one to use multiple cartridge sets without having to supply chips for every set. But it took me a while to realize this on my own. So, be sure to point that out in your next related video.
Here is an even better solution for thinning & flattening the plastic on the back of the chip:
Secure the chip, contacts down, to the center of the wide-side of a 1”x2" about 6” long with double-faced tape;
Tape a sheet of 150 grit sandpaper on a horizontal flat surface, face up;
Lay two popsicle-stick-like (link) spacers on the sandpaper, parallel to each other and about 4” apart, to act as runners. They should be the same thickness as you want the chips (including their plastic bases) to be when you are finished. If popsicle sticks are too thick, look for pieces of cardboard of the right thickness (perhaps two layers from a cereal box);
Orient the 1”x2” so that the chip faces the floor and its long axis is perpendicular to the spacers. Set it down straddling the spacers, so that chip base lies between the spacers and contacts the sandpaper. Now, rub it back and forth on the sandpaper until both ends of the 1”x2” ride on both spacers simultaneously.
Voila! You are done and the chip assembly is exactly the right thickness over its entire surface.
Anybody can do that quickly, safely, and successfully. (Note that the final thickness of the chip assembly can also be controlled by adding layers of tape between it and the 1”x2” or to the undersides of both runners.)
Add your product to the cart to view shipping rates. We've delivered to 289,762 customers in 149 countries.

Sign up for our newsletter to get weekly coupons and tips on printer refills and repairs.
Got a question? Don't hesitate to email us at support@bchtechnologies.com
Subscribe to Kevin's YouTube channel for the latest tips on printer repair and maintenance.
Recently viewed


VERY VERY SUPER PRODUCT. I purchased this product from Kevin and I can always say that Kevin is the best. Kevin definitely creates the best videos on the web. He has the best products and I always buy from him. Kevin also always recommends the best methods. I always recommend buying BCH TECHNOLOGIES products to always have perfect printers.
Alessandro R.
Instruction Sheet for L1800 / 1390 Printhead Testing with Multimeter (Digital Download) Instant Download — Delivered to Your Email
Best thing ever!! i used to put cleaning solution in the capping station with a syringe/hose then had to suck out f the wast line with a syringe.... over and over until the capping station was clean. maybe up to 10 times. now i just use maybe 1 or 2 - 30ml syringes full of water and the pump cleans it out so good.... then I put capping solution, place printhead over capping station and turn on the back of the machine. thats it. when i print again, usually next day, I pull from waste tank a few times until I get ink, then i run 1 head cleaning , print a test strip and usually good to go. I sometimes print a 2nd test strip. SO MUCH easier to use this little pump. so glad I bought it.
Ruth F.
TMS Printhead Maintenance System by BCH: Comprehensive Cleaning and Maintenance Solution
This is a must have modification to save time troubleshooting. You will need to download Kevin's capping station video to disassemble the capping station. A definite must. You will also need a few other connections to hook this up. All parts are linked in his videos. Pro tip. Have patience and go slow. This modification will save you from a lot of headaches . I did this mod on Procolored L1800 about a year old . Thanks Kevin.
Vincent K.
Waste Ink Collection Tank Combo with Small Tube for Epson (AS-EP-WASTE-25MM)