


 Roll over image to zoom in
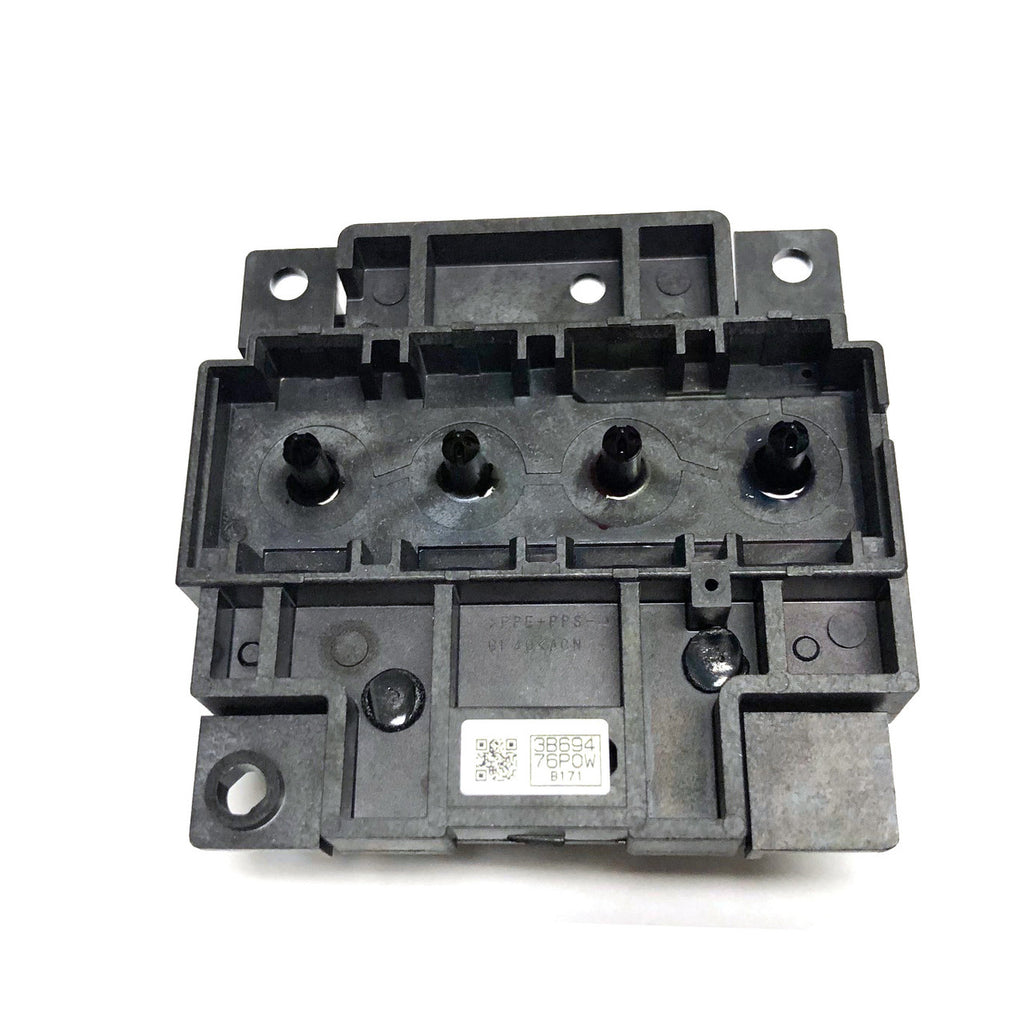
Used Genuine Epson FA04010 / FA04061 or FA040xx Printhead for XP, EcoTank ET-2700, ET-2800, ET-2900 and Compatible Models – Tested or Untested
Genuine Epson FA04010 / FA04061 or FA040xx Printhead This is a genuine Epson printhead removed from an Epson printer. The FA04010 / FA04061 printhead platform is used across a wide...
$31.99
SKU:
PPO-EP-Printhead-ET27UnTested
Categories:
Genuine Epson FA04010 / FA04061 or FA040xx Printhead
This is a genuine Epson printhead removed from an Epson printer. The FA04010 / FA04061 printhead platform is used across a wide range of Epson XP and EcoTank printers, including many models in the ET-2700, ET-2800, ET-2900, XP-200, XP-300, XP-400, XP-2100, XP-3100, and XP-4100 families.
Because Epson uses this printhead in many printer models and regional variations, it is not practical to list every compatible printer. Please compare the printhead, cable layout, mounting points, and part number with your original part before ordering.
Commonly Associated Models
Compatible or commonly associated models may include:
Epson XP-200, XP-245, XP-255, XP-257, XP-300, XP-302, XP-303, XP-305, XP-306, XP-310, XP-312, XP-313, XP-315, XP-322, XP-323, XP-332, XP-400, XP-401, XP-402, XP-403, XP-405, XP-406, XP-410, XP-412, XP-413, XP-415, XP-420, XP-423, XP-445, XP-455, XP-2100, XP-3100, XP-3150, XP-3155, XP-4100, XP-4105, XP-4150, XP-4155, and selected ET-2700, ET-2800, and ET-2900 series printers.:
ET-2400, ET-2450, ET-2500, ET-2550, ET-2600, ET-2650, ET-2700, ET-2710, ET-2720, ET-2750, ET-2760, ET-2800, ET-2803, ET-2810, ET-2820, ET-2830, ET-2850, ET-2851, ET-2855, ET-3710, ET-3760, and ET-4700.
This list is provided as a reference only and is not a guarantee of compatibility with every regional or model variation.
Available Condition Options
Please select your preferred condition option before adding the product to your cart.
Untested Printhead
The printhead is removed from a donor printer and visually inspected for obvious physical damage. No electrical, printing, or nozzle testing is performed. ⇗Click here to learn how to test this printhead with a multimeter⇗
An untested printhead:
-
May work normally
-
May have missing or clogged nozzles
-
May have an electrical fault
-
May not work at all
The buyer accepts all risks associated with purchasing an untested electronic component.
Tested Printhead
The printhead is cleaned, inspected, and tested before shipment. A nozzle-check result is provided to document its printing condition at the time of testing.
Tested printheads are prepared after the order is placed. This process requires additional cleaning, testing, labor, and careful packaging.
The printhead may be shipped with an Epson-compatible storage solution inside the ink channels. This solution helps protect the printhead during storage and transportation but is thicker than ordinary ink and may not clear immediately through normal printing.
Installation and Initial Cleaning
Printhead replacement is an advanced repair procedure. Before installing this part, confirm that the printer’s mainboard, FFC ribbon cables, ink-delivery system, capping station, pump, and waste-ink path are functioning correctly.
After installation:
-
Confirm that all cables are inserted straight and fully seated.
-
Confirm that the printer contains ink and that the ink system is properly primed.
-
Run the printer’s built-in printhead-cleaning function.
-
Print a nozzle check.
-
Do not perform more than three cleaning cycles consecutively.
If the nozzle check remains incomplete after the third cleaning cycle, stop repeated cleanings and allow the printer to rest. A park-and-prime procedure may be required to draw ink through the printhead.
Park-and-Prime Procedure
Park and prime uses the printer’s capping station and pump system to draw ink gently through the printhead. It does not require removing the dampers or forcing fluid directly into the printhead.
-
Turn on the printer and allow the printhead to park naturally over the capping station.
-
Do not manually force the carriage into the parked position.
-
Access the waste-ink tank or waste-ink outlet area.
-
Locate the waste-ink tube above the waste tank.
-
Attach a syringe securely to the waste-ink tube.
-
Slowly pull approximately 4 to 6 mL with the syringe.
-
Stop pulling and hold the syringe in place for approximately 10 to 20 seconds.
-
Watch for ink to move through the waste tube and into the syringe.
-
Reconnect the waste-ink system.
-
Run one built-in printhead-cleaning cycle and print another nozzle check.
Understanding Syringe Resistance
The syringe plunger pulls back strongly or springs forward like rubber:
This may indicate a blockage in the capping station, pump, or waste-ink path. The printer may not be able to prime any printhead until the blockage is corrected.
The syringe pulls only air with little or no resistance:
This may indicate an air leak, damaged tubing, weak pump, poor cap seal, or improper contact between the printhead and capping station.
Ink slowly enters the syringe after several seconds:
This generally indicates that the capping station is creating suction and drawing ink through the printhead.
Do not apply excessive vacuum, force cleaning solution into the printhead, repeatedly run cleaning cycles, or unnecessarily remove ink-system components. These actions may damage the printhead or printer.
Important Final-Sale Policy
All condition options are strictly non-returnable and final sale.
This includes both tested and untested printheads.
We do not accept:
-
Returns
-
Refunds
-
Exchanges
-
Replacements
-
Store credits
-
Warranty claims after installation
Installation problems, incorrect diagnosis, incompatibility, printer damage, mainboard faults, damaged ribbon cables, clogged capping stations, ink-delivery problems, and damage caused during installation or troubleshooting do not qualify for a return or replacement.
A tested nozzle check confirms the printhead’s condition at the time it was tested. It does not guarantee that the printhead will operate correctly in a printer with additional electrical, mechanical, firmware, or ink-system problems.
Once installed, it is generally impossible to determine whether a failure was caused by the printhead, printer electronics, cables, installation process, ink system, capping station, pump, or another component.
By purchasing this product, you acknowledge that:
-
You have confirmed the correct part and compatibility.
-
You understand that printhead installation is an advanced repair.
-
You accept responsibility for installation and troubleshooting.
-
You understand that this product cannot be purchased as a diagnostic trial part.
-
You accept the no-return and final-sale conditions.
Please purchase only after confirming compatibility and accepting all conditions above.
Related products




Add your product to the cart to view shipping rates. We've delivered to 289,762 customers in 149 countries.

 Weekly Promotion
Sign up for our newsletter to get weekly coupons and tips on printer refills and repairs.


Got a question? Don't hesitate to email us at support@bchtechnologies.com


Subscribe to Kevin's YouTube channel for the latest tips on printer repair and maintenance.
Recently viewed

23%
$499.00
$649.00



I ordered 2 sets of this 3ft tubing. I struggled with several companies websites trying to find this size tubing in a longer size. Finally i settled and ordered this - even though 3ft would be too short and I'd need to meld some of the second set to the first set to make it long enough. Item got here quick, i opened the box and bam! They sent me 6 ft. Because i ordered 2 sets of 3ft. Common sense like this doesn't exist anymore. I was expecting to need to improvise and they fixed a problem they didn't even know i had simply by doing what makes sense! Wonderful!! Cannot say how grateful i am. Give a raise to the person who was in charge of this order. It also fits perfectly in the other dimensions and should be exactly what i need for my printer.
Shawn V.
[C2] 3FT 1.4MM ID 6-Strand Non-Solvent Tube for Desktop CIS Tubing
VERY VERY SUPER PRODUCT. I purchased this product from Kevin and I can always say that Kevin is the best. Kevin definitely creates the best videos on the web. He has the best products and I always buy from him. Kevin also always recommends the best methods. I always recommend buying BCH TECHNOLOGIES products to always have perfect printers.
Alessandro R.
Instruction Sheet for L1800 / 1390 Printhead Testing with Multimeter (Digital Download) Instant Download — Delivered to Your Email
Best thing ever!! i used to put cleaning solution in the capping station with a syringe/hose then had to suck out f the wast line with a syringe.... over and over until the capping station was clean. maybe up to 10 times. now i just use maybe 1 or 2 - 30ml syringes full of water and the pump cleans it out so good.... then I put capping solution, place printhead over capping station and turn on the back of the machine. thats it. when i print again, usually next day, I pull from waste tank a few times until I get ink, then i run 1 head cleaning , print a test strip and usually good to go. I sometimes print a 2nd test strip. SO MUCH easier to use this little pump. so glad I bought it.
Ruth F.
TMS Printhead Maintenance System by BCH: Comprehensive Cleaning and Maintenance Solution