


 Roll over image to zoom in
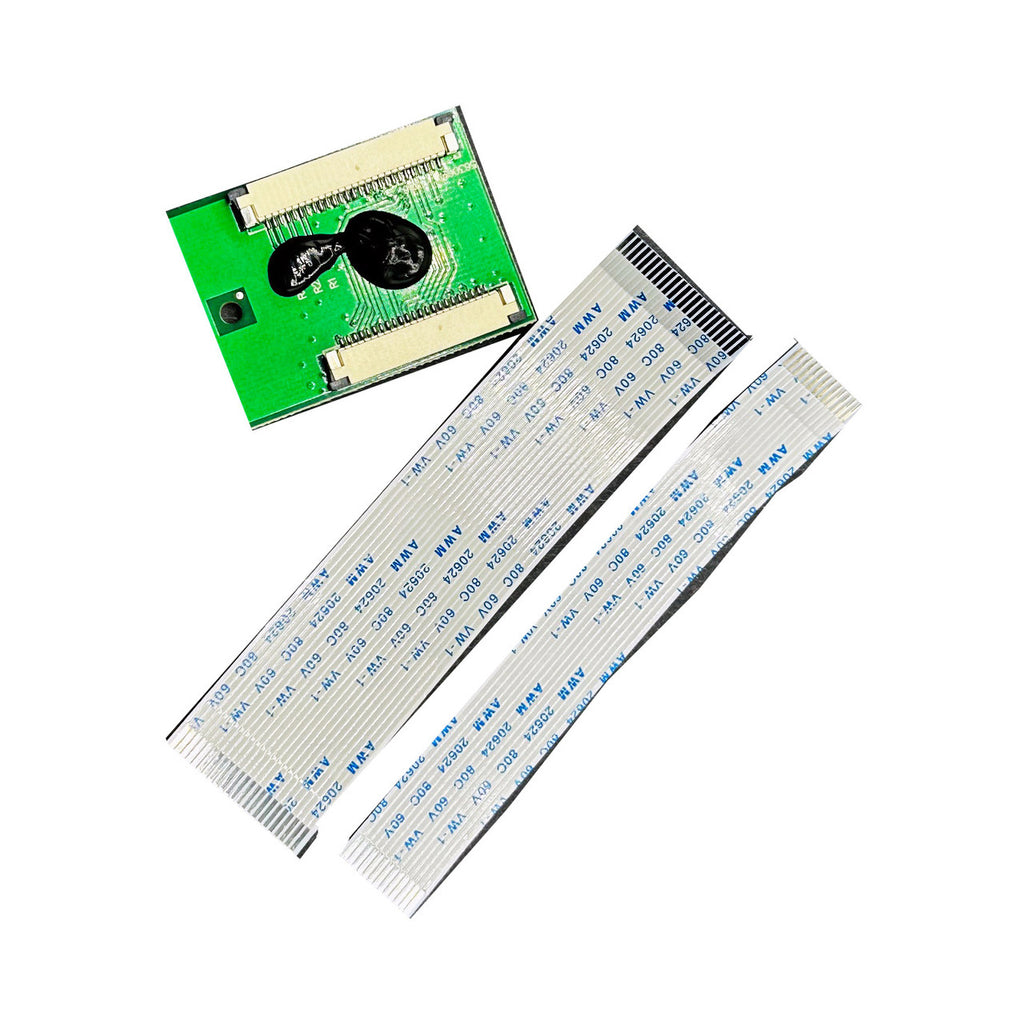
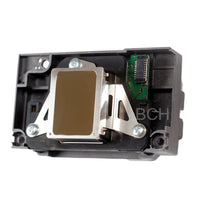
Printhead Conversion Breakout Board: L1800/1390 to L805/L800 Adapter Riser Bridge Card
This adapter board allows you to convert an Epson L1800 or Epson R1390 printer to use an Epson L805/L800 printhead. It is specifically designed for UV, DTF, and DTG modified...
$45.99
This adapter board allows you to convert an Epson L1800 or Epson R1390 printer to use an Epson L805/L800 printhead.
It is specifically designed for UV, DTF, and DTG modified printers built on the L1800/1390 engine.
Because L1800/1390 printheads are more expensive, this adapter gives you the option to switch to the more affordable and widely available L805/L800 printhead—without replacing your mainboard or modifying your printer’s electronics.
✔ What This Kit Does
This board bridges the different cable formats used by each printhead:
-
L1800/1390 printhead uses:
-
Wide data cable (27 pins)
-
Power cable (9-pin)
-
-
L805/L800 printhead uses:
-
Narrower data cable (23-pin)
-
Power cable (13-pin)
-
Your printer already has the 9-pin power cable and the wider L1800/1390 data cable, now your goal is to connect to a wider power cable and narrower data cable on the L805.
This adapter board converts those connections to the L805/L800 cable format.
📦 Package Includes
-
L1800/1390 → L805/L800 adapter board
-
Two short cables:
-
One wide short data cable (23 pins)
-
One 13-pin power/data cable
-
Not Included (comes from your printer):
-
The original wide L1800/1390 data cable
-
The original 9-pin L1800/1390 power cable
These two cables come with your printer and are required for installation.
🔧 Understanding the Cables (Very Important)
Your L1800/1390 printhead uses two cables:
1. DATA Cable (Wide, 27 pins)
-
This is the bottom cable on your L1800/1390 printhead.
-
It connects printhead → motherboard.
-
Much wider than the L805/L800 data cable.
-
NOT included in this listing.
2. POWER Cable (9-pin)
-
This is the smaller upper cable.
-
Also connects printhead → motherboard.
-
NOT included in this listing.
The L805 printhead uses 13-pin connections for both power and 23-pin for data.
This adapter converts your printer’s wide cable + 9-pin cable to the L805 13-pin format.
🛠 Installation Instructions (Simplified & Clear)
A. Connect the DATA (PRINT SIGNAL) cables
-
Locate the two large sockets on the adapter board (on the same side).
-
Find the widest socket → this is for your original L1800/1390's 27-pin wide data cable.
-
Plug your printer’s data cable here.
-
-
The opposite large socket is slightly narrower → this is for the included wide 23-pin short cable.
-
Plug the included wide short cable here.
-
-
Connect the other end of the included 23-pin wide short cable to the L805 printhead data connector.
If the included wide cable is wider than your printhead socket, your printhead is actually already an L1800/1390 printhead—no conversion needed.
B. Connect the POWER cables
-
On the same adapter board, find the two smaller 9–13 pin sockets.
-
The smaller 9-pin socket connects to your printer’s original 9-pin power cable.
-
This cable comes from your motherboard (not included).
-
-
The slightly larger 13-pin socket is for the included 13-pin short cable.
-
Connect the other end of the included 13-pin cable to the L805 printhead power connector.
🔄 Switching Back to L1800/1390
You can revert back to connect a L1800/R1390 printhead at any time:
-
Unplug the adapter board
-
Reconnect your original L1800/1390 printhead using your existing cables
No permanent modification to the board or printer is required.
⭐ Who Needs This Adapter?
This adapter is made for:
-
Users whose L1800/1390 printhead is unavailable or too expensive
-
Builders of custom UV/DTF/DTG printers needing L805/L800 printhead compatibility
-
Anyone wanting to switch to affordable, easy-to-source L805 printheads
-
Repair shops that want cross-compatibility between engines
📌 Compatibility
Compatible Printers:
-
Epson L1800
-
Epson R1390
-
Printers using L1800/1390-based engines
Converts To:
-
Epson L805/L800 printhead
Not Needed For:
-
Stock Epson L805/L800 printers (they already use 13-pin printheads)
⚠ Important Notes
-
This listing does NOT include the original L1800/1390 data or power cables. You must use the cables already in your printer.
-
The adapter is passive; it does not modify firmware or require board changes.
Related products
Add your product to the cart to view shipping rates. We've delivered to 289,762 customers in 149 countries.

Sign up for our newsletter to get weekly coupons and tips on printer refills and repairs.
Got a question? Don't hesitate to email us at support@bchtechnologies.com
Subscribe to Kevin's YouTube channel for the latest tips on printer repair and maintenance.
Recently viewed


Best thing ever!! i used to put cleaning solution in the capping station with a syringe/hose then had to suck out f the wast line with a syringe.... over and over until the capping station was clean. maybe up to 10 times. now i just use maybe 1 or 2 - 30ml syringes full of water and the pump cleans it out so good.... then I put capping solution, place printhead over capping station and turn on the back of the machine. thats it. when i print again, usually next day, I pull from waste tank a few times until I get ink, then i run 1 head cleaning , print a test strip and usually good to go. I sometimes print a 2nd test strip. SO MUCH easier to use this little pump. so glad I bought it.
RUTH FIGUEROA
TMS Printhead Maintenance System by BCH: Comprehensive Cleaning and Maintenance Solution
This is a must have modification to save time troubleshooting. You will need to download Kevin's capping station video to disassemble the capping station. A definite must. You will also need a few other connections to hook this up. All parts are linked in his videos. Pro tip. Have patience and go slow. This modification will save you from a lot of headaches . I did this mod on Procolored L1800 about a year old . Thanks Kevin.
Vincent Kretlow
Waste Ink Collection Tank Combo with Small Tube for Epson (AS-EP-WASTE-25MM)
I purchased this product and messed it up first time. I somehow got superglue onto the main circuit board on the colour cartridge and for some reason (not sure how) I messed up the black one too. I repurchased the product (x2). I tried again with the colour one first (which is meant to be the most difficult). I was careful to wrap the circuit board and print head in cling film and taped it down on top. I was careful with the superglue and let it dry upside down for 24 hours so that if the glue leaked anywhere it wouldn't go towards the circuit board. It works great. I now have a functioning refillable colour cartridge. I am glad I got the hardest one out of the way first. I will shortly try the black one. But fantastic that overall, I know this product will save me a fortune in printing now. The colour one is obviously the hardest and it works! Good job guys. (I am from the UK which is why we spell colour with a u lol).
Daniel Cunningham
Modification Kit for Making Spongeless Cartridge with Canon PG-210 CL-211 PG-240 CL-241 PG-245 CL-246 PG-243 CL-244 PG-260 CL-261 PG-275 CL-276