


 Roll over image to zoom in
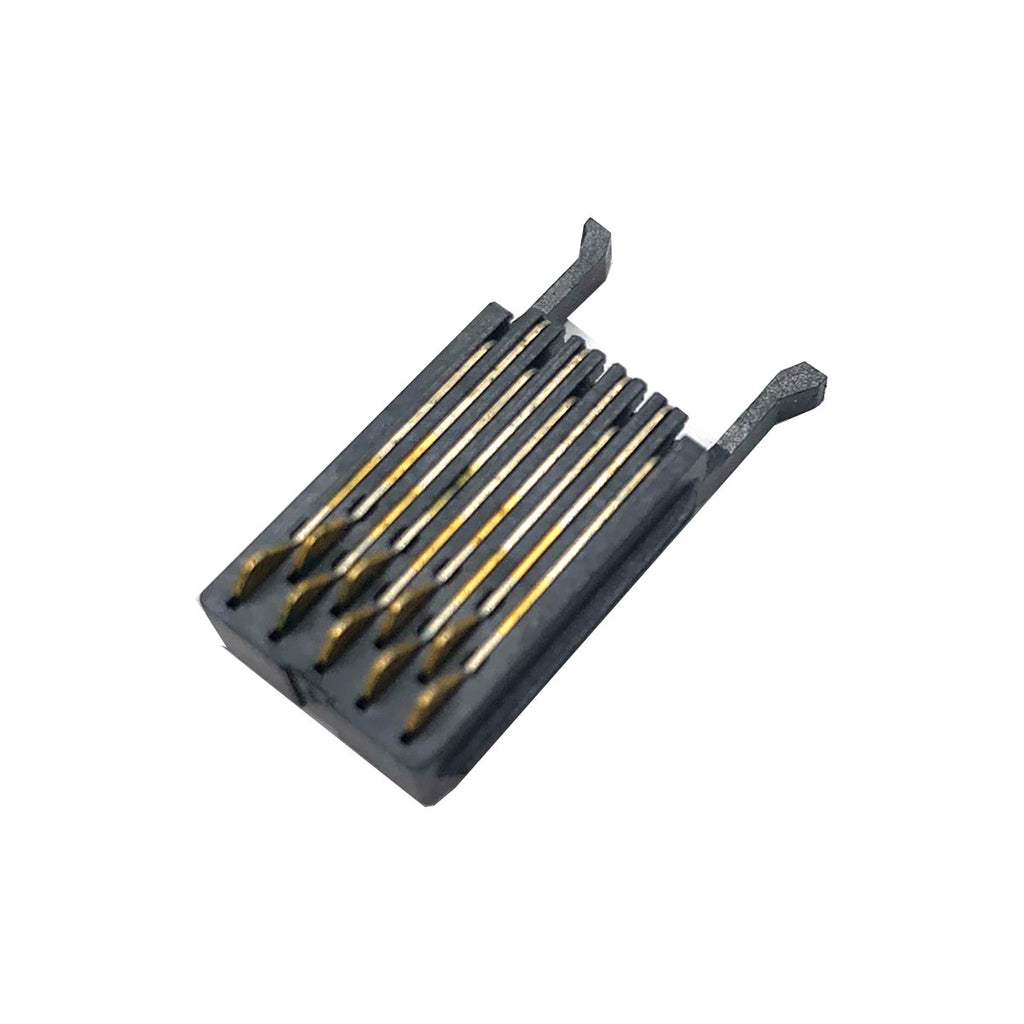
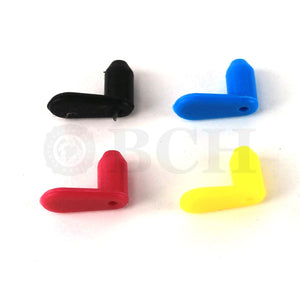
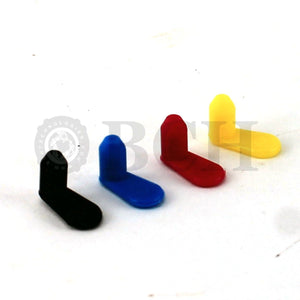
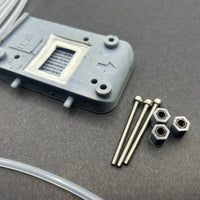
One RARE Winged 9-Pin Epson Cartridge Chip Board CSIC Pins
Package includes: 1 x 9-Pin. Winged (rare). Winged 9-pins are rare (mostly for older models). Make sure you got the correct type (see below for how to check) Replace broken...
$9.99
SKU:
PPO-EP-CSIC-9PIN-WING
Categories:
Package includes: 1 x 9-Pin. Winged (rare).
Winged 9-pins are rare (mostly for older models). Make sure you got the correct type (see below for how to check)
- Replace broken CSIC pins on ECB (Epson Cartridge Board). Epson's contact pins are notoriously easy to break. When the pin break, it creases "cartridge cannot be recognized" error. Instead of throwing the printer away, we can replace the broken pin with a new assebly.
- Package includes:
- One Winged 9-pin assembly.
How can I know what kind of CSIC my Epson uses?
Step 1. Winged vs. un-Winged.
a. Tell them apart by the wings
The WINGED chips will have two long arms on the top. They are usually used by older models like Artisan 1400 1430, some Stylus and early models of WorkForce (e.g., WF-830, WF-835).They are not very popular so consider "rare". Here is a picture example. 
The un-winged chips are just flat on the top (picture below). They are used in newer models such as WorkForce WF-3620 WF-3620 WF-7720 and Expression XP model such as XP-6100 XP-7100. 
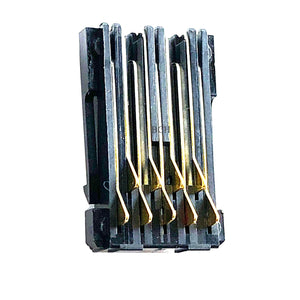
b. Tell them apart by the shape of pins.
Some times the top of the chip is covered by plastics. You can still tell them apart by the shape of the pins. The un-winged pins are more triangular. The winged pins are rounder.

Also, all un-winged chips are 9-pin, but winged chips have 7, 8-left, 8-right, and 9-pin.
If your printer has a structure surrounds the 9-pin, so you cannot see if it has wing or not. The chances are it is an un-winged 9-pin. If you have a winged 9-pin, it should be very easy to tell. In the example below, an Expression XP. The chip is covered by blue plastics but you can tell it is un-winged from the triangular shape of the pins. 
WorkForce 6090. You can tell it is an un-winged because 1) it is a WorkForce 2) It has triangular shaped pins.
Step 2. NUMBER OF PINS.
Take a look of your "good" CSIC pins, which color can be recognized by the printer. Don't look at your broken one because it may have missing pins.
- All un-Winged chips have 9 pins.
- Winged chips can have 7, 8, or 9 pins.
If a winged chip has 7 or 8 pins, then take a look of this picture. All of the chips are the same, except some pins may not present. The 7-pin is basically a winged 9-pin with two pins removed (red arrows). 8-pin has two versions: 8-Left and 8-Right. 9-pins have all the pins. For example, you can buy a 9-pin and remove two pins to make it a 7-pin, or buy a 7-pin and install two pins to make it a nine.


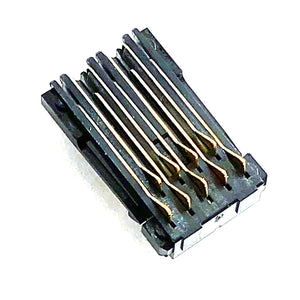
Front or Back?
The front (where the pins contact the cartridge) will have pins coming down all the way. The back (where the pins contact inside the printer) has pins coming down halfway and a batch box on the bottom. The batch box will have manufacture's name and batch number but it is not important to match these with your old chips.

Easy installation:
-
- 1. Remove ECB from base
- 2. Slide out the assembly with broken pins
- 3. Slide in the new assembly
Related products
Add your product to the cart to view shipping rates. We've delivered to 289,762 customers in 149 countries.

Sign up for our newsletter to get weekly coupons and tips on printer refills and repairs.
Got a question? Don't hesitate to email us at support@bchtechnologies.com
Subscribe to Kevin's YouTube channel for the latest tips on printer repair and maintenance.
Recently viewed


I purchased this product and messed it up first time. I somehow got superglue onto the main circuit board on the colour cartridge and for some reason (not sure how) I messed up the black one too. I repurchased the product (x2). I tried again with the colour one first (which is meant to be the most difficult). I was careful to wrap the circuit board and print head in cling film and taped it down on top. I was careful with the superglue and let it dry upside down for 24 hours so that if the glue leaked anywhere it wouldn't go towards the circuit board. It works great. I now have a functioning refillable colour cartridge. I am glad I got the hardest one out of the way first. I will shortly try the black one. But fantastic that overall, I know this product will save me a fortune in printing now. The colour one is obviously the hardest and it works! Good job guys. (I am from the UK which is why we spell colour with a u lol).
Daniel Cunningham
Modification Kit for Making Spongeless Cartridge with Canon PG-210 CL-211 PG-240 CL-241 PG-245 CL-246 PG-243 CL-244 PG-260 CL-261 PG-275 CL-276

The Tubes Were Great! I Love The New Tubes! They Worked Out Perfectly! I Will Be Purchasing Other Items In Your Store. BCH You Are Awesome!!! Keep Up The Good Work!
Stevie Johnson
[C2] 3FT 1.8MM ID 8-Strand Solvent Ink Tubing for Color & White DTF Tube Large Format Printer CIS
I purchased this product and messed it up first time. I somehow got superglue onto the main circuit board on the colour cartridge and for some reason (not sure how) I messed up the black one too. I repurchased the product (x2). I tried again with the colour one first (which is meant to be the most difficult). I was careful to wrap the circuit board and print head in cling film and taped it down on top. I was careful with the superglue and let it dry upside down for 24 hours so that if the glue leaked anywhere it wouldn't go towards the circuit board. It works great. I now have a functioning refillable colour cartridge. I am glad I got the hardest one out of the way first. I will shortly try the black one. But fantastic that overall, I know this product will save me a fortune in printing now. The colour one is obviously the hardest and it works! Good job guys. (I am from the UK which is why we spell colour with a u lol).
Daniel Cunningham
Modification Kit for Making Spongeless Cartridge with Canon PG-210 CL-211 PG-240 CL-241 PG-245 CL-246 PG-243 CL-244 PG-260 CL-261 PG-275 CL-276